Building a 32 core Kubernetes cluster for less than $1,000
May 15, 2021
I enjoy working with distributed systems, and I also enjoy working with embedded devices and single-board computers, so I thought it would be fun to combine these interests and build a Kubernetes cluster using some Raspberry Pi computers. This seemed like a low-cost way to have an always-on cluster that can be used to learn more about Kubernetes, and distributed computing in general.
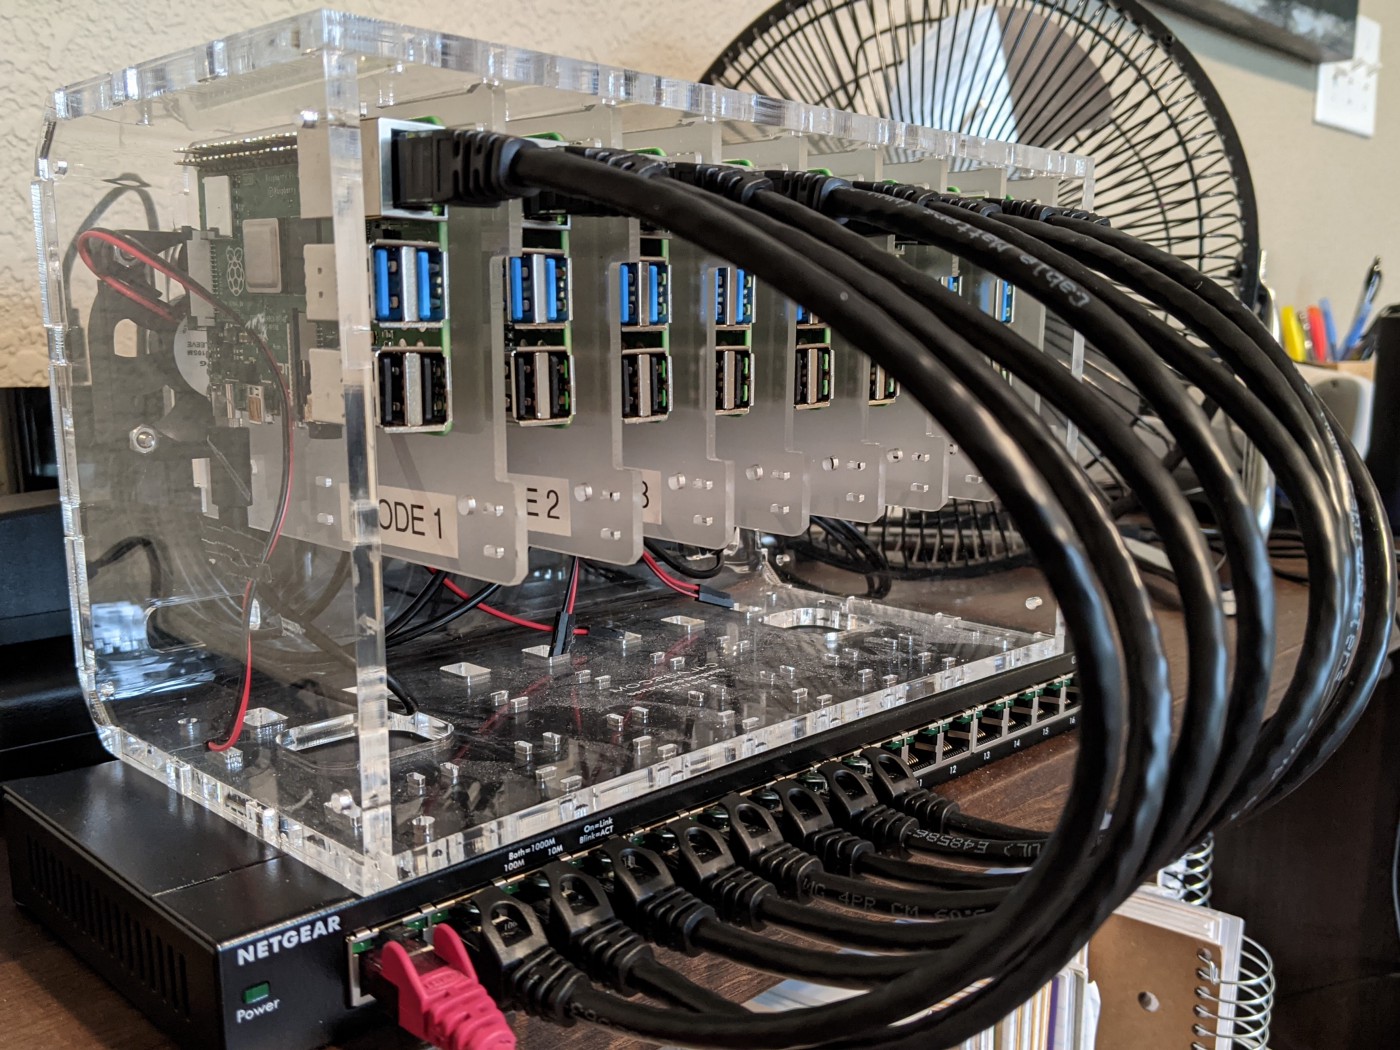
Here is a photo of the end result.
In this blog post, I provide full instructions, parts list, and costs, for anyone that wants to create their own low-cost cluster.
Motivation
I will mostly be using my cluster to run benchmarks for DataFusion and Ballista, which are both part of the open-source Apache Arrow project. DataFusion is an in-memory query engine that can be embedded in other applications, and Ballista is a distributed query engine based on DataFusion. These projects are implemented in Rust, and it should be possible to optimize them so that they scale down well to environments with limited compute resource. There could be valid use cases for using DataFusion and Ballista in IoT devices and in edge computing.
I also enjoy testing the robustness of distributed systems in physical environments like this. Although you can use Chaos Monkey to simulate failures, it is really satisfying to physically disconnect network cables or remove power from nodes and see what happens. Maybe this is just me geeking out and of no real practical value, but I think it is important to have a bit of fun when you can. This is also great for live demos when we are back to attending meetups in person.
Hardware
Single-board computers like the Raspberry Pi are sensitive to static and accidental shorting, so we need to mount them in some kind of enclosure. We also need to consider power and cooling. There are professional solutions available, such as blades that can be mounted in standard computer racks, but I was looking for a low cost and portable solution, so I chose the Cloudlet CASE for the enclosure. This is an acrylic kit that includes four small fans that are powered by the Pis.
We will also need a network switch to connect the Pis to. We will need to keep one port spare to connect this switch to a LAN (unless you plan on only accessing the cluster over Wi-Fi). I am using all 8 slots in the case, so I needed a network switch with more than 8 ports, and it was cheaper to buy this 16-port switch than any of the 9 or 10 port switches that I could find. It also provided a nice base for the cluster to sit on.
There are the parts that I used for my cluster, excluding the nodes. All prices are exclusive of tax and shipping.
- Cloudlet CASE — $69.99
- NETGEAR 16-port Gigabit Ethernet Switch (GS316) — $44.99
- Ethernet Cables — $15.99
There are the parts that I used for each node:
- Raspberry Pi 4 Model B w/ 4GB RAM — $66.95
- SanDisk Ultra microSDXC UHS-I Card (64 GB) — $11.99
- USB-C Wall Adapter — $4.95
- USB-C Cable — $4.50
This means we have an initial cluster cost of $130.97 as well as a per-node cost of $88.43.
Total Cost
If we take advantage of all 8 slots in the case then we have a total cost of $838.41 for a cluster consisting of 32 cores, 32 GB RAM, and 512 GB disk space. Peak power consumption for this configuration would be 122.4 Watts. Alternatives
This approach of building a Kubernetes cluster is relatively low cost, but also has limited compute capabilities and very limited disk space and bandwidth (although it is possible to add NVMe storage via a USB adapter for around $60 per node).
Before deciding to replicate this project, you should look at other options to see what would work best for your use case. For example, I recently purchased a refurbished Proliant server from Amazon for less than $350 and this provides 12 physical cores with Hyper-Threading, resulting in 24 virtual cores. It also provides 64 GB RAM and 2.4 TB of HDD configured as a RAID array. It is also large and noisy and ideally should be mounted in a server rack. In a future blog post, I will show some comparisons of performance between these two environments.
Part 1: Basic Cluster Setup
Set up each Pi
Download the 64-bit server image of Ubuntu for Raspberry Pi and then follow the instructions for burning the downloaded image onto each SD card, booting each Pi and obtaining the IP address.
For me, the process looked like this:
- I used the official Raspberry Pi Imager on my Ubuntu desktop to burn the images to the SD cards.
- I booted the Pis one at a time, connected to a keyboard and monitor, because I find this much simpler than using Linux networking utilities to discover the devices on the network. I also connected each Pi to my ethernet network for this stage of setup.
- On first login (user “ubuntu”, password “ubuntu”) I was prompted to change the password.
- I then ran sudo apt install net-tools followed by
ifconfigto get the IP address. - Finally, I powered down the Pi with sudo shutdown -h now, waited for the green LED to stop blinking, then removed the cables and inserted the Pi into the cluster case.
Go Remote
With the base operating system installed, and each Pi installed in the cluster, it is time to access the nodes from our desktop.
I ran sudo vi /etc/hosts and added the following lines. Obviously, your IP addresses will be different.
# Raspberry Pi Cluster
10.0.0.187  pi1
10.0.0.111  pi2
10.0.0.131  pi3
10.0.0.162  pi4
10.0.0.104  pi5
10.0.0.214  pi6
10.0.0.75   pi7
10.0.0.95   pi8
It is now possible to ssh into each pi by host name. For example, I can run ssh ubuntu@pi1 to connect to the first node.
By default, every Pi will have the hostname “ubuntu”. We will run into problems trying to add nodes to the Kubernetes cluster if all the nodes have the same name, so we need to change them.
Connect to each pi in turn using ssh and run sudo nano /etc/hostname and change the hostname from “ubuntu”
to “pi1” for node 1, “pi2” for node 2, and so on, and then run sudo reboot to restart the Pi.
Disable DHCP
Before we set up the Kubernetes cluster, we will want to make sure that the IP addresses won’t change the next time we reboot the Pis, so it is important to login to your router/gateway and find the devices and change the configuration to use fixed IP address (using the current addresses) rather than using DHCP.
Tired of typing passwords?
If you aren’t tired of typing the password yet, you will be soon, so let’s set up the Pis so that we can access them without typing the password each time.
If you don’t already have an SSH key set up then you can create one with the following command on Linux:
ssh-keygen -t ed25519 -C "your_email@example.com"
Use the ssh-copy-id utility to copy this key to each node. For example, here is the command to copy the key to node 1.
ssh-copy-id ubuntu@pi1
It should now be possible to ssh into each node without using a password.
Update Software
This is a good time to connect to each Pi in turn using ssh and run the following commands to update to the latest patches.
sudo apt update
sudo apt upgrade
Part 2: Kubernetes
Install MicroK8s
Run sudo nano /boot/firmware/cmdline.txt and add the following options to the start of the line:
cgroup_enable=memory cgroup_memory=1
On my setup, the line looked like this after adding the new attributes.
cgroup_enable=memory cgroup_memory=1 net.ifnames=0 dwc_otg.lpm_enable=0 console=serial0,115200 console=tty1 root=LABEL=writable rootfstype=ext4 elevator=deadline rootwait fixrtc
Once the file has been updated, run sudo reboot to restart the Pi.
Wait a couple of minutes for the Pi to reboot and then connect again with ssh and run the following commands to install MicroK8s.
sudo snap install microk8s — classic
Next, we want to change the permissions so that we can run commands as the ubuntu user without having to use sudo. Run the following commands to add the ubuntu user to the microk8s user group and to change ownership of the installed files to the ubuntu user.
sudo usermod -a -G microk8s ubuntu
sudo chown -f -R ubuntu ~/.kube
The permissions don’t take effect until logging out and logging back, so type exit to end the session and then connect again with ssh.
Add nodes to the cluster
For each node (except for pi1) we need to generate a token on the controller node (pi1) and then run a command on the node to be added.
For each node to be added, run microk8s.add-node on pi1. This will show output similar to:
From the node you wish to join to this cluster, run the following:
microk8s join 10.0.0.187:25000/d428730d97fa46626e7325e0c1fad658
From the node to be added, run the suggested command. You should see output similar to:
Contacting cluster at 10.0.0.187
Waiting for this node to finish joining the cluster. ..
These commands take quite a while to run. I didn’t time it, but it felt like a couple of minutes.
Once this completes, run the following command on pi1 to confirm that the node has been added:
microk8s.kubectl get nodes -o wide
Repeat this process for each node to be added.
In my case, the final output looked like this:
NAME STATUS ROLES AGE VERSION INTERNAL-IP EXTERNAL-IP OS-IMAGE KERNEL-VERSION CONTAINER-RUNTIME
pi2 Ready <none> 24m v1.20.6–34+a8572511797071 10.0.0.111 <none> Ubuntu 20.04.2 LTS 5.4.0–1034-raspi containerd://1.3.7
pi1 Ready <none> 30m v1.20.6–34+a8572511797071 10.0.0.187 <none> Ubuntu 20.04.2 LTS 5.4.0–1034-raspi containerd://1.3.7
pi6 Ready <none> 6m10s v1.20.6–34+a8572511797071 10.0.0.214 <none> Ubuntu 20.04.2 LTS 5.4.0–1034-raspi containerd://1.3.7
pi3 Ready <none> 21m v1.20.6–34+a8572511797071 10.0.0.131 <none> Ubuntu 20.04.2 LTS 5.4.0–1034-raspi containerd://1.3.7
pi5 Ready <none> 10m v1.20.6–34+a8572511797071 10.0.0.104 <none> Ubuntu 20.04.2 LTS 5.4.0–1034-raspi containerd://1.3.7
pi7 NotReady <none> 14s v1.20.6–34+a8572511797071 10.0.0.75 <none> Ubuntu 20.04.2 LTS 5.4.0–1034-raspi containerd://1.3.7
pi4 Ready <none> 15m v1.20.6–34+a8572511797071 10.0.0.162 <none> Ubuntu 20.04.2 LTS 5.4.0–1034-raspi containerd://1.3.7
Conclusion
We now have a fully functioning Kubernetes cluster! The next step is to find something fun to run on it. I will post a follow-on blog post in the next few weeks once I have some results to share.